| ||||||||||||||||||||||||||||
Welcome to the | ||||||||||||||||||||||||||||
 | ||||||||||||||||||||||||||||
 | ||||||||||||||||||||||||||||
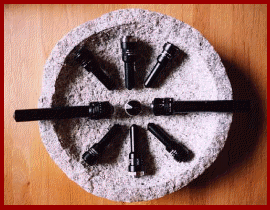
Photo above - Pinhole lenses, including an 11mm 'short' lens (middle), 6.2mm f2 general purpose optics | ||||||||||||||||||||||||||||
| ||||||||||||||||||||||||||||
'Covert' PINHOLE LENSES - continued
4mm f2, 6.2mm f2, 9mm f3.4, From personal experience, Doktor Jon would have to say that the middle three (6.2 - 12.4mm) actually offer the best overall optical quality (examples of which can be seen in the covert section). Quite obviously, the 18mm combination is rather ‘slow’ and so a very sensitive colour camera (or perhaps even Black and White) will need to be used in order to achieve a respectable quality image, under poor lighting conditions. In almost all situations, auto iris is a complete and utter waste of money on a pinhole lens, as the available light levels are generally best dealt with using the Electronic Iris facility in the camera. This also provides the benefit of a generally sharper image, with better depth of field. Here's a Doktor Jon Top Tip for you; when trying to align a pinhole lens camera to the viewing hole, it’s actually worth closing the aperture to around f11 so the outside of the viewing hole can be clearly seen on the test monitor. Once aligned, the aperture can then be opened up to f2.8 or at best f4, and a bright clear and hopefully sharp evidential quality image will have been achieved without too much fuss, and with no loss of corner detail, usually associated with camera misalignment. One final point, most pinhole lenses do not have a focus ring, so any adjustments need to be made using the cameras ‘back focus’. In most situations, it's far easier to set the focus to a pre measured equivalent point, before attempting to install the camera in situ.
| ||||||||||||||||||||||||||||
 | ||||||||||||||||||||||||||||
IMPORTANT: No material may be reproduced, copied or redistributed from this site, © doktorjon.co.uk 2004 - 2008 Homepage...:...Gateway...:...Technical Gateway....:....Quickfind Index....:....Equipment Directory | ||||||||||||||||||||||||||||